Sunday, November 20, 2011

Harry Potter Birthday Party.

First of all, let me just say, a huge risk involved in having a child in your life (even if it's a friend's little one), that no one ever tells you about, is that they will inevitably fall in love with something, at some point, that is no longer popular with anyone else. For example - Lyam's obsession with Harry Potter.

Now before you start rolling your eyes and yelling at the monitor, I know, the last movie JUST came out on disk. But they're already getting set up to do the Disney thing and "vault" the collection. Which means everything Harry Potter has suddenly gotten even harder to find and more expensive even than it was before.

$5.79 plus shipping for 12 napkins with Daniel Radcliffe's picture on it? I don't think so.
$7.99 for 8 plates with the logo on it? Forget it.

The old Wilton Harry Potter Bust pan that retailed for $11.99 and could be gotten cheaper with a coupon, now is discontinued and only available used starting at (I'm not kinding) $34.50 + plus shipping! And there's no guarantee that a used cake pan won't be too warped to use.

But Lyam had to have a Harry Potter Birthday and Lisa and I were determined to make it happen. So we went online and we found a Hogwarts Cake Set, complete with figurines of Harry, Ron, and Hermoine. And it was a decent price and eligible for free shipping from Amazon! Jackpot!

Then is showed up in the mail. 3 days before the party and it is the saddest, most pathetic thing you have ever seen - with no instructions or suggestions about cake size or anything. But the figures are good. Like, really good. Good enough to make it worth the money anyway. So I figure I can work with this.

I bought the Wilton "Romantic Castle Set." It's meant to make a fairy tale princess castle, but also has intructions for a "Medieval Fortress" and at this point, I'm feeling like anything would be close enough.


So after about a million false starts and a last minute realization that I was short a box of cake mix, we finally get the cake going.

With the last minute addition of Rice Crispie Treats for the top layer, we're in business.


Then I realize I don't have my little round detail tip. And I'm at someone else's house. In the middle of not much. Miles and miles from any legitimate cake or candy supply store. So we head to bed with the decision to hit Walmart early in the morning.

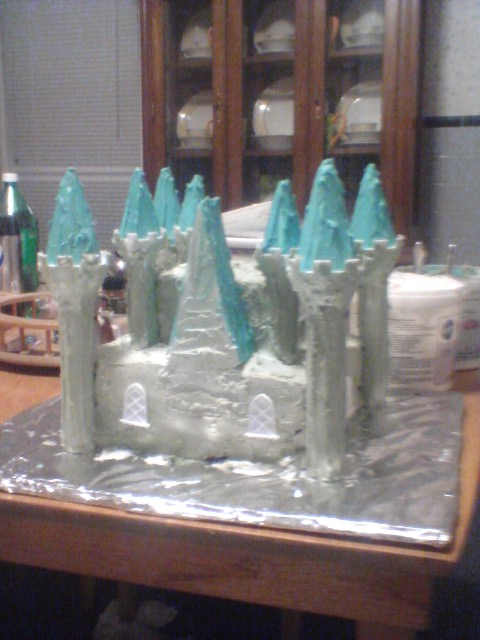
I bought some icing writers and a cheap ass, good enough to get through round tip and we're back to finishing up the cake.


Decorated with banners to match the streamers around the house and everything. With the addition of our heroes, it turned out to be an impressing castle and a pretty passable Hogwarts.


The figures really were very good, it's a shame I couldn't just get them without the crushing disappointment that was the rest of the set they came in.


And while the decorating was a bit hurried in places and a little clumsy due to the belated realization that I hadn't brought all of my tools with me, the cake was a huge hit.


Tuesday, November 8, 2011

Perfectly Plaid Placemats (set of 4)

materials:
worsted weight cotton in two colors (I used Lily's Sugar and Cream)
----> To make one of each placemat you'll need 5-6 balls of one color and about 4 balls of the other/
size "I" hook
large eye yarn needle


notes:
for all color changes, draw up new color for last yo of previous row


placemat #1:


w/ color 1 (C1), ch 52, turn
Row 1:  dc in 6th ch from hook, (ch 1, sk 1 ch, dc in next dc) across; 24 ch-sps
Row 2: ch 4, turn, dc in next dc, (ch 1, dc) in ea dc across.
Row 3-6: with color 2 (C2), rep Row 2
Row 7-10: w/ C1, rep Row 2
Row 11-14: wC2, rep Row 2
Row 15-18: w/ C1, rep Row 2
Row 19-22: w/ C2, rep Row 2
Row 23-26: w/ C1, rep Row 2
Row 27-30: w/ C2, rep Row 2
Row 31,32: w/ C1 rep Row 2
finish off

weaving:
cut 48 strands of each color approx. 6" longer than larger dimension of placemat.
holding 4 strands together, weaving will run perpendicular to your crocheted rows, to create plaid, use yarn needle to make weaving easier

Row 1: w/ C1, pass yarn under beginning ch, and over next, continue in this manner across.  leave a tail on both ends
Row 2: w/ C1, in next space, pass yarn over beginning chain and under next, continue across.
alternating over and under starts, follow the remaining rows of the color pattern
Rows 3-6: C2
Rows 7-10: C1
Rows 11-14: C2
Rows 15-18: C1
Rows 19-22: C2
Rows 23,24: C1

to finish off the weaving, start at any corner, separate the set of 4 strands into 2 pairs,  pull one pair to the opposite side of the chain so that 2 strands are on either side of your foundation mesh. 
hold all 4 strands back together and knot to keep in place.
once all strands are knotted at both ends, trim fringe to make it even.

placemat #2:


Rows 1,2: work same as placemat #1
Row 3: with C1, rep Row 2
Row 4,5: w/ C2, rep Row 2
Rows 6-11: w/ C1. rep Row 2
Rows 12,13: w/ C2, rep Row 2
Rows 14-19: w/ C1, rep Row 2
Rows 20,21: w/ C2, rep Row 2
Rows 22-27: w/ C1, rep Row 2
Rows 28,29: w/ C2, rep Row 2
Rows 30-32: w/ C1, rep Row 2

weaving:
following basic instruction from placemat #1, use the following color pattern

cut 48 strands of each color

Rows 1,2: C1
Rows 3,4: C2
Rows 5-8: C1
Rows 9,10: C2
Rows 11-14: C1
Rows 15,16: C2
Rows 17-20: C1
Rows 21,22: C2
Rows 23,24: C1


placemat #3

Rows 1,2: work same as placemat #1
Rows 3-6: still with C1, rep Row 2
Rows7,8: w/ C2, rep Row 2
Row 9: w/ C1, rep Row 2
Rows 10,11: w/ C2, rep Row 2
Rows 12-32: w/ C1, rep Row 2

weaving:
following basic instruction from placemat #1, use the following color pattern

cut 72 strands of C1 and 24 strands of C2

Rows 1-4: C1
Rows 5,6: C2
Row 7: C1
Rows 8,9: C2
Rows 10-20: C1
Rows 21,22: C2
Rows 23,24: C1


placemat #4


Rows 1,2: same as placemat #1
Row 3: still with C1, rep Row 2
Rows 4,5: w/ C2, rep Row 2
Row 6: w/ C1, rep Row 2
Rows 7,8: w/ C2, rep Row 2
Rows 9-13: w/ C1, rep Row 2
Rows14,15: w/ C2, rep Row 2
Rows 16, 17: w/ C1, rep Row 2
Rows 18,19: w/ C2, rep Row 2
Rows 20-24: w/ C1, rep Row 2
Rows 25,26: w/ C2, rep Row 2
Row 27: w/ C1, rep Row 2
Rows 28,29: w/ C2, rep Row 2
Rows 30-32: w/ C1, rep Row 2

weaving:
following basic instruction from placemat #1, use the following color pattern

cut 48 strands of each color

Rows 1,2: C2
Row 3: C1
Rows 4,5: C2
Rows 6-9: C1
Rows 10,11: C2
Rows 12,13: C1
Rows 14,15: C2
Rows 16-19: C1
Rows 20,21: C2
Rows 22: C1
Rows 23,24: C2


Monday, September 19, 2011

Ruffle Brim Hat

The vase works remarkable well as a hat manikin.

2 strands of worsted weight yarn held together
size "N" hook

ch 5, sl st in 1st st to form ring, sl st in ring
Rnd 1: ch 3, 11 dc in ring, join w/ sl st to 3rd beg ch
Rnd 2: sl st bet ch and 1st dc, dc in same sp, working bet sts - 2 dc in ea sp around, join w/ sl st to 3rd beg ch
Rnd 3: sl st bet ch and 1st dc, working bet sts - dc around, join w/ sl st to 3rd beg ch
Rnd 4: sl st bet ch and 1st dc, working bet sts - (dc, 2 dc in next sp) around, join w/ sl st to 3rd beg ch
Rnd 5: sl st bet ch and 1st dc, working bet sts - dc around, join w/ sl st to 3rd beg ch
Rnd 6: sl st bet ch and 1st dc, working bet sts - (2 dc, 2 dc in next sp) around, join w/ sl st to 3rd beg ch
Rnd 7-11: sl st bet ch and 1st dc, working bet sts - dc around, join w/ sl st to 3rd beg ch
Rnd 12: sl st bet ch and 1st dc, working bet sts - (3 dc in next sp, 2 dc in next sp) around, join w/ sl st to 3rd beg ch
Rnd 13, 14: sl st bet ch and 1st dc, working bet sts - dc around. join w/ sl st to 3rd beg ch

finish off

Hat Band:
working around the posts of Rnd. 11, join w/ sc and sc around, join w/ sl st to 1st sc

finish off
weave in ends.

Toddler Ruffle Brim Hat

Yeah, it's still got the ends hanging out. What of it?

2 strands of Fingering Weight Yarn, held together
size "J" hook

ch 5, sl st in 1st st to form ring, sl st in ring
Rnd 1: ch 3, 11 dc in ring, join with sl st to 3rd beg ch
Rnd 2: sl st bet ch 3 and 1st dc, dc in same sp, working bet sts - 2 dc in ea sp around, join w/ sl st to 3rd beg ch
Rnd 3: sl st bet ch 3 and 1st dc, working bet sts - dc around, join w/ sl st to 3rd beg ch
Rnd 4: sl st bet ch 3 and 1st dc, working bet sts - dc, 2 dc in next sp, join w/ sl st to 3rd bed ch
Rnd 5-8: sl st bet ch 3 and 1st dc, working bet sts - dc around. join w/ sl st to 3rd beg ch
Rnd 9: sl st bet ch 3 and 1st dc, working bet sts - 3 dc in next sp, 2 dc in next sp, join w/ sl st to 3rd beg ch
Rnd 10: sl st bet ch 3 and 1st dc, working bet sts - dc around, join w/ sl st to 3rd beg ch

finish off and weave in ends

Saturday, September 17, 2011

Alternating Shells Afghan!

My apologies in advance for rotten photo quality, the ceiling light when bad in my living room about 2 days ago and I haven't had the opportunity to replace it yet.

I made a great big snuggly afghan so that the munchkin can grow with it, and I made it in somewhat more grown-uppy colors for the same reason. I want this afghan to be used until it falls apart, not until she's too cool to like the colors I picked.

It's gotten the seal of "Snuggle Approval" from our official product tester. Honestly, it was getting hard to keep him off of it so I could finish the thing.
The pattern is simple alternating shells with a 4 round border.

if you are using multiple colors, choose an odd number of colors to reduce the number of ends you have to work in, with an odd number (I like 3) you can simply pick up the color you need next at the end of the row and carry your yarn along the outside edge. when you crochet the first row of the border, you'll be hiding all that yarn!

ch desired length, a multiple of 6 +2.
Row 1: sc in 2nd ch from hook, * sk 2 ch, work shell (3 dc, ch 1, 3 dc) in next ch, sk 2 ch, sc in next ch, rep from * across. turn
Row 2: ch 3, 2 dc in last sc of prev row, * sc in ch-sp, work shell (3 dc, ch 1, 3 dc) in sc, rep from * across, work 3 dc in last sc, turn
Row 3: ch 1, sc in first dc, * work shell in sc, sc in in ch-sp, rep from * across, sc in 3rd beg ch

if changing colors, change with the last yo of each row. rep rows 2 and 3 to desired size

Last Row: work across this row picking up pattern depending on which row you ended with - dc in sc, hdc in first dc, sc in next 4 dc, hdc in next dc, dc in sc and so on across.

Border:
Rnd 1: single crochet around placing 3 sc in the corners.
Rnd 2: half double crochet around, placing 3 hdc in the corners
Rnd 3: double crochet around, placing (2 dc, ch 1, 2 dc) in the corners
Rnd 4: single around, working between sts of prev row, placing 3 sc in the corner ch-sp.

Friday, September 16, 2011

Afghan is imminent!

So, with Dave and Julie's munchkin #2 on the way (due the first week of October!) I've been working like a madwoman to get this afghan done. It's been a chore the whole way because even though everyone who's seen it has loved it, I've never really been a huge fan of the pattern. I finally got far enough that I felt it was a good size and now I've been working on the border for a couple of days.

It looks good. I'm happy with the results. I'm just not that into making zillions of shells and nothing but, ya know? Once I have it finished I"ll post a couple of good pics and maybe if I ask nice I can get a pic of munchkin #1 with her afghan.

Sunday, August 21, 2011

Can't take the heat!

I'm dying for the weather to take a turn towards fall! I can't wait to take the nephew apple picking again, I think this year he'll be able to help make applesauce! I love jack o'lanterns and colorful leaves and temperatures in my kitchen that allow for pots to bubble away without making the whole downstairs hot and gross!

Most of all, I look forward to actually being able to sit under an afghan or a quilt to work on it! I have a baby afghan to finish for Dave and Julie and the baby is coming up fast! She's due the beginning of October and I have almost half the afghan to finish, but without air conditioning in most of the house, I couldn't even consider working on it.

I have a quilt top that needs to be made into a quilt and I have a huge set of Dresden Plates that need to be made into a quilt top and then finished off. I have a few sewing projects I'd like to do for the nephew, too!

More than anything, I'm tired of making fabric yo-yo's because it's too hot to work on anything else. Not that I dislike making yo-yo's, I just like to have a choice.

I do love summer because of my garden, but I get very little done with yarn or any larger projects.

Monday, July 25, 2011

Bumming around the house.

So, apparently, we were exposed to MRSA. If you don't already know, MRSA is an incredibly antibiotic-resistant variety of Staph.

So far, neither of us seems to be infected, but we're still waiting to hear about the lab work to see if we're carrying it, and potentially contagious in spite of not actually getting sick. We spent the weekend in more or less of a quarantine - we were allowed out of the house, but no hugging anybody, and no close contact with small children, elderly, diabetics, pregnant women, or people with compromised immune systems.

The plus side is, we got a lot of cleaning and laundry done, and I finished my quilt top!


My mom got some bird print fabric squares at a yard sale for like 10 cents for the bundle. I decided to edge them in dusty aqua and then a brown print to frame them out a little before assembling them into a quilt.


I worked on the borders of the squares on and off most of the week, and on Saturday I took advantage of being stuck at home and finished them up and started assembling them into the quilt top.


I couldn't seem to get a good pic in the studio.

The lighting was all wrong every time. However, I've discovered that from the right angle, my backyard takes a beautiful picture. Here's the finished top, hanging from the fence, just above my herb garden!

I'm going to wait until the weather heads for cooler temps before I iron this and start actually assembling the quilt.

Friday, July 8, 2011

Pluggin' along.

I made 80 miles on my bike for June! I was aiming for 100, but I'll take it. I'll try for 100 again this month. This time I know that I need to take a couple significant rides other than the trip to work to get there.

Carl still hasn't gotten into the habit of running, even though he keeps saying he wants to. I've even offered to go with him and give it a shot. Any ideas how to motivate him???

I got a tip from Me You Health about using cucumber to flavor water and I'll tell you what, I'm completely in love with it! Super easy, just drop a few slices in your glass and let it sit a minute.

I feel like I may have lost a bit more, but I haven't been near a scale to check. I'll have to weigh in at my mom's in the morning. Unless I'm not remembering correctly when I think that she has a scale.

I have a bike ride planned with my mom in the morning, so I'm gonna keep this short.

Wednesday, July 6, 2011

Busy Bee.

Been working on 2 afghans on and off as well as a cross stitch and brainstorming another pattern for the "Fishin' Buddies" booklet. I'd like to say I have a good reason for not posting more regularly, but let's be honest with ourselves here.

I have been busy, work, family stuff, the garden, started bike commuting, still getting the house in order and so on, but if I can find the time to play Wheel of Fortune on Facebook, I can make time for the blog.

Liam is done with school now, so work should be starting back up at Tilghman Street, which means more work on Crochet Pages. The site for Tilghman Street needs to be much more interactive than Crochet Pages ever has and hopefully some of what I learn in the process of making that happen will transfer over to give you all the best look and feel we've ever had.

You all know that crochet is one of my favorite things, and while I may walk away from time to time to get other stuff taken care of, in the end I'm always back to my art. Especially the one that's nearest and dearest to my heart. I come from a long line of needlework types and I'm not about to let that drop off in favor of silly things like having a social life or planting a garden. ;-)

Tuesday, May 17, 2011

Been a while.

It's been a while since I posted anything on here and I wanted to show you all what I've been working on!


I've been spending more and more time outside. And getting the sunburn to show for it. (I've learned my lesson, and I've invested in both Aloe Gel and good Sunblock.)

Go easy on me, it was the first gorgeous day this spring and it wasn't hot. I bounced happily out the door wearing a tank top and never even realized I had sunburn until it started to itch later that night.


Some friends of ours adopted a little girl (I believe she's about 3 years old) so I made her a bear!


Friends of ours in Baltimore are expecting Baby #2 this fall, so I've been working on an afghan for them. Even when I have my nephew at McDonald's. I get the chance to work while he's playing, and sometimes I even get to share my web site or talk yarn with other parents!


Got up to Glen Onoko for the first time! We didn't go up the Falls this time because we actually had a project we wanted to sit and work on, but we did walk out the access road/bike trail quite a distance.

We climbed around at the base of the falls a bit, and it looks like my knee is going to hold up pretty well for me this summer, as long as I'm not stupid about the hiking and climbing.


I bought a bike last week and I've been riding to work as weather allows. I've walked for a little over a month now, and happily switched over to riding, it means I get a little extra time in my morning, and I don't need a ride home. Without losing anymore time out of my day to my commute than I did when I was walking one way and getting a ride the other.

Friday, April 8, 2011

Checking in with you all.

I haven't forgotten about you all, I just haven't been designing much. The priority at our house has been getting healthy. Portion control, smarter snack choices, and for me, no more dairy. My mom and our close friends are being hard-core supportive, which is awesome.

The no dairy thing has been tough, because I love cheese and ice cream and cheesecake and did I mention cheese. Or ice cream. But with some help from vegan/vegetarian friends, I'm adjusting.

It's going pretty well. With a little luck I will start having a little more time for designing once new eating and grocery shopping requirements become the routine.

Thanks for bearing with me!

Thursday, March 17, 2011

Hardware Store Bracelet


I bought everything I needed (materials wise) for this bracelet at Home Depot for less than $10.


Shopping List:

  • Neon Cord - 5/32" Diamond Braid Poly, All-Purpose Cord. I bought blue, but it comes in other colors.
  • 1/4" - 20 Hex Nuts or machine nuts.
  • 1" S hooks


Tools from home:

  • size N crochet hook
  • large eye needle
  • sturdy pliers

Thread about 20 nuts onto your cord. Start off with a slip knot around your hook, leaving about a 4" tail


Slide 1 nut against the knot and work your chain stitch, the nut should fall onto the "back" of the chain.


Slide 1 nut against work and chain 1. Repeat to desired length. You probably won't need all of the nuts, I only needed about a dozen, but extra is always good.


To add your closure, unravel the outer layer of the cord until about 1" from your work. Cut off the inner core. With your needle, weave the unraveled ends back through your work.


Repeat for other end. Slip S hook into one loop, and squeeze closed with the pliers. Leave the other end open so you have an S clasp.


Monday, February 28, 2011

We got Featured!

For those of you who didn't see the Facebook status in the sidebar, Age's Crochet Pages got featured on AllFreeCrochet.com! As part of their St. Patrick's Day holiday patterns, they've selected my 4-Leaf Clover Doily.

To see the Feature on AllFreeCrochet!

Or go straight to the pattern!

Haven't given up.

Those of you who follow my other blog, Live Like a Hippy, will have seen me posting like crazy about homemade spa goodies, especially Lip Balm. Have no fear, I haven't stopped crocheting.

I've actually been working on a pattern book! The working title is "Creature Comforts" and it's going to be filled with animal inspired winter gear, for little kids and big kids! So far, I've got a Snuggly Diamond Back scarf, the Shark Attack Hat, a Frog hat, and the Brain Worm Scarf/hat combo.

I'm hoping to come out with roughly a dozen patterns when all is said and done. Also, now that my arm is healed (I fell victim to all the ice in Allentown the other week) I should be able to do a lot more crochet work. I'll gonna finish up the laptop sleeve I'm working on, so I can keep my shiny new Toshiba shiny and new and then dig right back into the Creature patterns.

I've also got a couple of new ideas bouncing around for the Fishin' Buddies booklet. And don't worry, I haven't forgotten that a lot of you are here for the free stuff. I've got a couple ideas in that category too.

Thursday, February 17, 2011

So which is it?

It started the other night. Last Wednesday actually. You've probably heard about it. There was a huge Natural Gas explosion here in Allentown. A 3 block walk from my house. Almost.

We're fine, no damage to our house or anything, but let me tell you, the shockwave from an explosion can leave a lasting impression. Knowing that 5 people died in the resulting fire kinda sticks with you too.

My heart goes out to all of the families affected, this is a true tragedy. And made worse by the fact that our Natural Gas infrastructure is a mess and at the rate they're currently fixing things, it'll be roughly the 2nd of Never when the upgrades are finally finished.

We sat and did some math. The necessary upgrades will cost $13 billion to complete. But I was curious, what does that much money look like? How do you get your head around that many zeros. I looked up the population of Allentown and at the most recent estimate it's roughly 111,000 people. Then we said, a Grande White Mocha is $5.50 give or take.

So:

$13 billion divided by 111,000 people, divided by $5.50 per White Mocha, equals approximately 21,000 coffees per person.

21,000 coffees per person divided by 365 days in a year, works out to 58 years and about 2 months.

In other words, the cost of repairing that Natural Gas infrastructure in our little city, is roughly equivalent to free coffee for the entire city for the next 6 decades.

WOW!

That's all very fascinating, but I'm not sleeping now. I've been up until like 2am for something like 7 nights in a row now. Granted Saturday and Sunday I had off and some of those nights I did close at work, but still.

The question is, is this just insomnia triggered by a rather frightening event (a friend of mine actually needs to have repairs done to her living room wall from the shockwave) or am I having some sort of existential crisis. Add in the fact that I have OCD and it's anybody's guess.

All I know, is right now Tylenol Simply Sleep is the only reason I'm getting anything close to enough sleep to keep going. Bleh.

Thursday, February 3, 2011

Sock it to Me!

A sock making tutorial, finally. From the top down.

Knit in the round for desired cuff length in desired pattern.

Heel:
Knit halfway around your sock, turn, slip one stitch knitwise, purl back across to second last st, turn, slip one stitch knitwise, knit back across to 2nd last stitch of previous Row. Continue in the pattern, working one less stitch each time, until approximately 6 stitches remain.

Starting next row, work on more stitch each row until you've worked 1 stitch past first row of heel.

Foot:
work in desired desired pattern until foot comes up to base of toes.

Toe: knit 1, knit 2 together, knit until 3 stitches short of halfway point, knit 2 together, knit 2, knit 2 together, knit across until 3 stitches remain, knit 2 together, knit 1

repeat until 6-12 stitches remain (depending on weight of yarn - less stitches for thicker yarn), sew toe closed and finish off.


Thursday, January 27, 2011

I have a new baby! (sorta)

I am the proud owner of a brand new laptop!!!! We finally bit the bullet and bought a brand new Toshiba Satellite! This should help my productivity and upload schedule significantly, especially since I'm working on a new pattern book.

Also, I've had a couple of brainstorms for the Fishin' Buddies booklet. As soon as Open Office finishes downloading I'm going to get started working!

Good things are happening and I hope that you all will feel that it's been worth the wait.